Total Graphics Design (Illustrator_part_7)

Using the Brush Tool and Path Finder Panel
Using the brush tool, different objects, borders, etc. are created. On the other hand, two or more objects can be transformed into an object using a path finder. When opening a new file, make sure the Inches Set is set in the Units portion of the Art board.
Or from the menu, select File> Document Setup. The Document Setup dialog box appears.
Brush Tool এবং Path Finder প্যানেলের ব্যবহার
Brush টুল ব্যবহার করে বিভিন্ন ধরনের অবজেক্ট, বর্ডার ইত্যাদি
তৈরী করা হয়। অপর দিকে Path Finder ব্যবহার করে দুই বা ততোধিক অবজেক্টকে একটি অবজেক্টে
রুপান্তর বা খন্ড তৈরী করা যায়। নতুন File খোলার সময় Art
board অংশের Units অংশে Inches সেট আপ আছে নিশ্চিত হয়ে নিন।
অথবা মেনু থেকে File>Document Setup কমান্ড দিন। Document Setup ডায়ালগ বক্স আসবে।

On top of the options, the Art Board will be selected. If you do not select the Units option in the Setup group, then select Inches from the drop down and OK. If you select Inches in advance, do not change OK.
সবচেয়ে উপরে অপশনে Art board সিলেক্ট থাকবে। Setup গ্রুপের Units অপশনের Inches সিলেক্ট না থাকলে ড্রপ ডাউন থেকে Inches সিলেক্ট করে OK করুন। পূর্বেই Inches সিলেক্ট থাকলে পরিবর্তন না করে OK করুন।
সবচেয়ে উপরে অপশনে Art board সিলেক্ট থাকবে। Setup গ্রুপের Units অপশনের Inches সিলেক্ট না থাকলে ড্রপ ডাউন থেকে Inches সিলেক্ট করে OK করুন। পূর্বেই Inches সিলেক্ট থাকলে পরিবর্তন না করে OK করুন।
1. At the bottom left of the Color Selection section of the toolbox, click on the button that says "Default Fill and Stroke".
১. টুলবক্সের Color Selection অংশের নিচে বাম দিকে অবস্থিত ছোট জোড়া বক্স অর্থাৎ Default Fill and Stroke কালার বাটনে ক্লিক করুন।

Draw any object in it, stroke color black and fill color white.
এতে যে কোন অবজেক্ট আঁকলে Stroke কালার Black এবং Fill কালার White হবে।
এতে যে কোন অবজেক্ট আঁকলে Stroke কালার Black এবং Fill কালার White হবে।
2. Click on the Rectangle tool from the toolbox and select it.
২. টুলবক্স থেকে Rectangle টুলে ক্লিক করে সিলেক্ট করুন।

2. Click on the Rectangle tool from the toolbox and select it.
৩. ডকোমেন্টের ফাঁকা অংশে ক্লিক করুন। Rectangle আঁকার জন্য Rectangle ডায়ালগ বক্স আসবে।
৩. ডকোমেন্টের ফাঁকা অংশে ক্লিক করুন। Rectangle আঁকার জন্য Rectangle ডায়ালগ বক্স আসবে।
4. From Options, type Width in Width and type 4 in the Height portion, OK.
৪. Options থেকে Width অংশে 2 in এবং Height অংশে 4 in টাইপ করে OK করুন।

A 4 Inches tall and 2 Inches wide box with white color fill and black color stroke will be made.
White কালারের Fill এবং Black কালারের Stroke সহ একটি 4 Inches লম্বা এবং 2 Inches চওড়া বক্স তৈরী হবে।
White কালারের Fill এবং Black কালারের Stroke সহ একটি 4 Inches লম্বা এবং 2 Inches চওড়া বক্স তৈরী হবে।
5. From the Hidden tool in the Rectangle Tool group, select the third tool ie Ellipse tool and click once on the blank part of the document. Ellipse document window will come.
৫. Rectangle টুল গ্রুপের Hidden টুল থেকে তৃতীয় টুল অর্থাৎ Ellipse টুল সিলেক্ট করুন এবং ডকোমেন্টের ফাঁকা অংশে একবার ক্লিক করুন। Ellipse ডকোমেন্ট উইন্ডো আসবে।

6. Type three in Width and 3 in height and OK. A circle will be created.
৬. Width অংশে 3 এবং Height অংশেও 3 টাইপ করে OK করুন। একটি সার্কেল তৈরী হবে।
7. Select the circle by clicking on the Selection tool and move it to center the rectangle and mix it down
৭. Selection টুল দ্বারা ক্লিক করে সার্কেলটি সিলেক্ট করুন এবং মুভ করে Rectangle টির উপর Center করে নিচের দিকে মিলিয়ে স্থাপন করুন

8. Press the Shift key and select Rectangle.
Pressing the Shift key will select two objects. You can select two objects by dragging the selection out of the field.
৮. Shift কী প্রেস করে Rectangle টি সিলেক্ট করুন।
Pressing the Shift key will select two objects. You can select two objects by dragging the selection out of the field.
৮. Shift কী প্রেস করে Rectangle টি সিলেক্ট করুন।
Shift কী প্রেস করার কারণে দুইটি অবজেক্টই সিলেক্ট হবে। Selection কী
দিয়ে বাইরে থেকে ড্রাগ করেও দুইটি অবজেক্ট সিলেক্ট করতে পারেন।
Align the object
It can be either vertical or horizontal align to two or more objects. Clicking the second row in the first row of the Align panel, two objects will be horizontal and center align.
অবজেক্টকে Align করা
দুই বা ততোধিক অবজেক্টকে
Vertical বা Horizontal Align করা সম্ভব। Align
প্যানেলের প্রথম সারির ২য় বাটনটিতে ক্লিক করলে
দুইটি অবজেক্ট Horizontal এবং Center
Align হবে।
9. Give Window> Align Command to open the Align panel. Align panel will come.
৯. Align প্যানেল খোলার জন্য Window>Align কমান্ড দিন। Align প্যানেল আসবে।

10. Click on the second row of the first row, ie Horizontal Align Center.
১০. প্রথম সারির ২য় বাটনে অর্থাৎ Horizontal Align Center বাটনে ক্লিক করে সিলেক্ট করুন।
১০. প্রথম সারির ২য় বাটনে অর্থাৎ Horizontal Align Center বাটনে ক্লিক করে সিলেক্ট করুন।

In the document window, the object will be center align in the horizontal way. Now let's equal the align below.
Document উইন্ডোতে অবজেক্ট দুইটি Horizontal ভাবে Center Align হবে। এখন নিচের দিকের Align সমান করব।
Document উইন্ডোতে অবজেক্ট দুইটি Horizontal ভাবে Center Align হবে। এখন নিচের দিকের Align সমান করব।
11. Click the last button in the first row, ie the vertical Align Bottom button.
১১. প্রথম সারির শেষ বাটন অর্থাৎ Vertical Align Bottom বাটনে ক্লিক করুন।
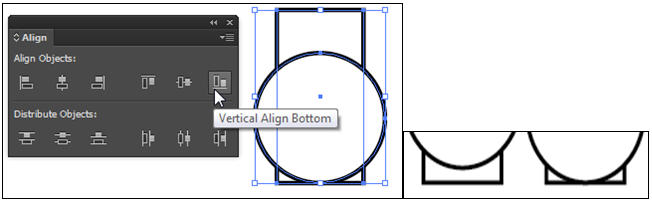
The bottom side of the object two will be equal.
অবজেক্ট দুইটির নিচের দিক সমান হবে।
অবজেক্ট দুইটির নিচের দিক সমান হবে।
Use of Pathfinder
Two or more objects can be added or separated using pathfinder.
Pathfinder এর ব্যবহার
Two or more objects can be added or separated using pathfinder.
Pathfinder এর ব্যবহার
Pathfinder ব্যবহার করে দুই বা ততোধিক অবজেক্টকে সংযোজন বা বিয়োজন
করা যায়।
12. Give Window> Pathfinder command to fetch Pathfinder panel.
The pathfinder panel will come. Clicking on the first row of the first row will add two shape and clicking on the second button will reduce the part of the second sept from the second shape.
১২. Pathfinder প্যানেল আনার জন্য Window>Pathfinder কমান্ড দিন।
Pathfinder প্যানেল আসবে। প্রথম সারির প্রথম বাটনে ক্লিক করলে ২টি
সেপ যোগ হবে এবং দ্বিতীয় বাটনে ক্লিক করলে দুইটি সেপ থেকে দ্বিতীয় সেপের বাড়তি অংশ
বিয়োগ হবে।
13. By clicking on the first button in the Pathfinder panel, click on the Add to Shape Area button. (Click the Expand text button for the previous version of Illustrator CS4.)
১৩. Pathfinder প্যানেলের প্রথম বাটন অর্থাৎ Add to Shape Area বাটনে ক্লিক করে সিলেক্ট করুন। (Illustrator CS4এর আগের ভার্সনের জন্য Expand লেখা বাটনটিতে ক্লিক করুন। )

Notice that the shape at the document window will be converted into a pair. Now the seaplane will permanently be a shape.
লক্ষ্য করুন ডকোমেন্ট উইন্ডোতে সেপ দুইটি একটি সেপে পরিনত হবে। এখন সেপ দুইটি স্থায়ীভাবে একটি সেপে পরিনত হবে।
লক্ষ্য করুন ডকোমেন্ট উইন্ডোতে সেপ দুইটি একটি সেপে পরিনত হবে। এখন সেপ দুইটি স্থায়ীভাবে একটি সেপে পরিনত হবে।
Tips: Clicking the first button in the Pathfinder panel, click on Add to Shape Area button (atl) and click on the Expand button on the right-most of the first row. Otherwise it will be done automatically.
Tips: Illustrator CS4-এ Pathfinder প্যানেলের প্রথম বাটন অর্থাৎ Add to Shape Area বাটনে () (Atl) চেপে ক্লিক করলে প্রথম সারির সবচেয়ে ডান দিকের Expand লেখা বাটনটিতে ক্লিক করতে হবে। তা না হলে Automatically হয়ে যাবে।
14. Again, select the Ellipse tool from Toolbox and click on empty document. The Ellipse dialog box will arrive.
১৪. আবারও টুলবক্স থেকে Ellipse টুল সিলেক্ট করে ফাঁকা ডকোমেন্টে ক্লিক করুন। Ellipse ডায়ালগ বক্স আসবে।
15. Width option 2 and in height option type .5 and OK. An oval will be made.
১৫. Width অপশনে 2 এবং Height অপশনে .5 টাইপ করে OK করুন। একটি ওভাল তৈরী হবে।

16. Select the Selection tool from the toolbox and place the oval at the top of the prefabricated floral tip.
১৬. টুলবক্স থেকে Selection টুল সিলেক্ট করুন এবং ওভালটিকে আগের তৈরী করা ফুলদানির সেপের উপরের দিকে স্থাপন করুন।
১৬. টুলবক্স থেকে Selection টুল সিলেক্ট করুন এবং ওভালটিকে আগের তৈরী করা ফুলদানির সেপের উপরের দিকে স্থাপন করুন।

17. When the new Oval Sepette is selected and press Shift from the key board, click on the previous page. It will select two sepies.
Tips: Selecting selection borders by dragging with the selection tool and selecting Separate two can be selected together.
১৭. নতুন ওভাল সেপটি সিলেক্ট থাকা অবস্থায় এবং কী বোর্ড থেকে Shift প্রেস করা অবস্থায় আগের সেপটিতে ক্লিক করুন। এতে দুইটি সেপই সিলেক্ট হবে।
Tips: Selecting selection borders by dragging with the selection tool and selecting Separate two can be selected together.
১৭. নতুন ওভাল সেপটি সিলেক্ট থাকা অবস্থায় এবং কী বোর্ড থেকে Shift প্রেস করা অবস্থায় আগের সেপটিতে ক্লিক করুন। এতে দুইটি সেপই সিলেক্ট হবে।
Tips: সিলেকশন টুল দিয়ে ড্রাগ করে
সিলেকশন বর্ডার তৈরী করেও সেপ দুইটি একত্রে সিলেক্ট করা যায়।
18. Again, click the second button in the first row of the Pathfinder panel, ie Subtract from Shape Area. (Click the Expand button for the previous version of Illustrator CS4.)
১৮. আবারও Pathfinder প্যানেলের প্রথম সারির দ্বিতীয় বাটন অর্থাৎ Subtract from Shape Area বাটনে ক্লিক করুন। (Illustrator CS4এর আগের ভার্সনের জন্য Expand বাটনে ক্লিক করুন।)
১৮. আবারও Pathfinder প্যানেলের প্রথম সারির দ্বিতীয় বাটন অর্থাৎ Subtract from Shape Area বাটনে ক্লিক করুন। (Illustrator CS4এর আগের ভার্সনের জন্য Expand বাটনে ক্লিক করুন।)

A total of three pairs of shapes will now be prepared.
মোট তিনটি সেপ মিলে এখন একটি সেপ তৈরী হবে।
মোট তিনটি সেপ মিলে এখন একটি সেপ তৈরী হবে।
19. Select the Gradient Button from the bottom of the color Selection section of the tool box.
১৯. টুল বক্সের Color Selection অংশের নিচ থেকে Gradient বাটন সিলেক্ট করুন।
১৯. টুল বক্সের Color Selection অংশের নিচ থেকে Gradient বাটন সিলেক্ট করুন।

20. Being selected will be filled with Gradient and Gradient Panel will come in.
২০. অবজেক্টটি
সিলেক্ট থাকার কারণে Gradient দিয়ে পূর্ন হবে এবং Gradient প্যানেল আসবে।

21. Click on Radial in the Type option.
Because the object is selected, the black, white Radial Gradient will be filled with.
২১. Type অপশনে Radial এ ক্লিক করুন।
Because the object is selected, the black, white Radial Gradient will be filled with.
২১. Type অপশনে Radial এ ক্লিক করুন।
অবজেক্টটি সিলেক্ট থাকার
কারণে Black, White Radial Gradient দিয়ে পূর্ন হবে।
22. Again, select the Ellipse Tool in the tool box and click on the document's empty space. The Ellipse dialog box appears and if Width = 2 and Height = 5. If not selected type OK. An empty oval will be made in the blank document and a full oval by Black, White Radial Gradient.
২২. আবারও টুল বক্সের Ellipse টুল সিলেক্ট করে ডকোমেন্টের ফাঁকা স্থানে ক্লিক করুন। Ellipse ডায়ালগ বক্স আসবে এবং Width = 2 এবং Height = .5 সিলেক্ট না থাকলে টাইপ করে OK করুন। ফাঁকা ডকোমেন্টে পূর্বের মাপের এবং Black, White Radial Gradient দিয়ে পূর্ন একটি ওভাল তৈরী হবে।
23. Select Selection Tool and move the oval to the previous place (on the flowering).
২৩. Selection টুল সিলেক্ট করুন এবং ওভালটিকে মুভ করে পূর্বের স্থানে (ফুলদানির উপর) স্থাপন করুন।

24 Close the selection by clicking outside the object or by selecting Select> Deselect from the menu.
২৪. অবজেক্টের বাইরে ক্লিক করে অথবা মেনু থেকে Select>Deselect কমান্ড দিয়ে সিলেকশন বন্ধ করুন।
২৪. অবজেক্টের বাইরে ক্লিক করে অথবা মেনু থেকে Select>Deselect কমান্ড দিয়ে সিলেকশন বন্ধ করুন।
Use of Symbol
25. Select tool 5 from toolbox, ie Paintbrush tool.
Symbol এর ব্যবহার
25. Select tool 5 from toolbox, ie Paintbrush tool.
Symbol এর ব্যবহার
25.
টুলবক্স থেকে ৫
নম্বর টুল অর্থাৎ Paintbrush টুল সিলেক্ট করুন।

26. In the Fill color option of the toolbox, click on the button in the bottom row of the Color Selection section at the bottom of the three tools, with the red color bar at the top of the button.
26. টুলবক্সের Fill কালার অপশনে, Color Selection অংশের নিচের সারিতে তিনটি টুলের মধ্যে সবচেয়ে শেষে লাল রঙের আড়াআড়ি রেখাসহ বাটন অর্থাৎ None বাটনে ক্লিক করুন।
26. টুলবক্সের Fill কালার অপশনে, Color Selection অংশের নিচের সারিতে তিনটি টুলের মধ্যে সবচেয়ে শেষে লাল রঙের আড়াআড়ি রেখাসহ বাটন অর্থাৎ None বাটনে ক্লিক করুন।

27. Fill in color will become None.
27. এতে Fill কালার None হয়ে যাবে।
27. এতে Fill কালার None হয়ে যাবে।
28. Now we will use the specified brush for the paintbrush tool. There are different types of brush in the default brush. You can also choose to brush the different groups from the Brush Library.
28. এখন আমরা Paintbrush টুলের জন্য নিদিষ্ট ব্রাশ ব্যবহার করব। Default ব্রাশের মধ্যে বিভিন্ন ধরনের ব্রাশ থাকে। এছাড়াও Brush Library থেকে বিভিন্ন গ্রুপের ব্রাশ সিলেক্ট করে নেওয়া যায়।
29. Enter Window> Symbol Libraries> Flowers from the menu. There will be different types of flowers.
29. মেনু থেকে Window>Symbol Libraries>Flowers কমান্ড দিন। বিভিন্ন ধরনের ফুল আসবে।

30. Click the right triangle button in the Flower Symbol panel and select Small List View from the drop down menu.
30. Flower Symbol প্যানেলের ডানদিকের ত্রিভুজ বাটনে ক্লিক করুন এবং ড্রপ ডাউন মেনু থেকে Small List View সিলেক্ট করুন।
30. Flower Symbol প্যানেলের ডানদিকের ত্রিভুজ বাটনে ক্লিক করুন এবং ড্রপ ডাউন মেনু থেকে Small List View সিলেক্ট করুন।

31. The symbols can be seen with names.
31. এতে সিম্বলগুলো নামসহ দেখা যাবে।
31. এতে সিম্বলগুলো নামসহ দেখা যাবে।

32. Select Calla Lily (or any flower symbol) from the panel by clicking on the symbol.
32.প্যানেল থেকে Calla Lily (অথবা যে কোন ফুলের সিম্বল) নামের সিম্বলের উপর ক্লিক করে সিলেক্ট করুন।
32.প্যানেল থেকে Calla Lily (অথবা যে কোন ফুলের সিম্বল) নামের সিম্বলের উপর ক্লিক করে সিলেক্ট করুন।
33. Now, let's take Calla Lily flower from the Flowers panel and bring it to the center of flowering.
A flower can be found.
33. এখন Flowers প্যানেল থেকে Calla Lily ফুলটি ড্রাগ করে ফুলদানীর মাঝখানে এনে ছেড়ে দিন।
একটি ফুল পাওয়া যাবে।
34. Now we will select another symbol, select Rosebud, Purple Cone flower, and drag it with the Selection Tool and place it in a large amount of flowers.
34. এখন আমরা অন্য সিম্বল সিলেক্ট করব, Rosebud, Purple Cone flower সিম্বলগুলো সিলেক্ট করে ড্রাগ করুন এবং সিলেকশন টুল দিয়ে টেনে ইচ্ছামত বড় করে ফুলদানির মাঝে বসান।

35. Select the Selection tool from the Tul Box and select by clicking on the bottom part of the flowering.
35.টুল বক্স থেকে Selection টুল সিলেক্ট করুন এবং ফুলদানির নিচের অংশ ক্লিক করে সিলেক্ট করুন।
35.টুল বক্স থেকে Selection টুল সিলেক্ট করুন এবং ফুলদানির নিচের অংশ ক্লিক করে সিলেক্ট করুন।

36. Now bring the flowers below the flowers in the flowers to bring the effect.
36.এখন ফুলগুলি ফুলদানির ভিতরে অবস্থিত এই ইফেক্ট আনার জন্য ফুলদানির নিচের অংশ উপরে আনবো।
36.এখন ফুলগুলি ফুলদানির ভিতরে অবস্থিত এই ইফেক্ট আনার জন্য ফুলদানির নিচের অংশ উপরে আনবো।
37. Menu> Object> Arrange> Bring to Front command.
37. মেনু থেকে Object>Arrange>Bring to Front কমান্ড দিন।

এখন ফুলগুলিকে ফুলদানির
ভিতরে অবস্থিত মনে হবে। সিলেকশন ছাড়ান এবং ফাইলটি সেভ করুন।

বিস্তারিত জানতে নিচের বইটি সংগরহ করে নিন

Book Name: GRAPHICS TRAINING GUIDE (Adobe Photoshop, Adobe Illustrator, Adobe InDesign, QuarkXPress, oDesk {Freelancing/Outsourcing} )
Writer: Bappi Ashraf
Published By: Gyankosh Prokashani
Amount of Pages: 624
First Publish: February - 2015
Last Edition: February - 2015. Future edition may be existed!
Book Price: BDT 490 with CD
The writer of this book has told that he has written this book with the concept of "teach yourself". On the other hand. He has also told that the book is full of fan and enjoyment. so that a person can learn by himself by playing with the example projects of this book. Book's CD Link below...

RELATED POST LINKS BELOW ********************************************
ADOBE ILLUSTRATOR
Part 003 - Control Panel সেটিং,Brush ও Type টুল এর ব্যবহার, Tool Boxএরব্যবহার, Tool Tips, Hidden টুল
Part 017 - Eraser টুল, Mercury Performance System, Gaussian Blur Enhancement, Image Trace, Pattern তৈরী, Stoke এ Gradient ব্যবহার
ADOBE PHOTOSHOP
Next Part _ Coming Soon 41
ADOBE INDESIGN

জ্ঞানকোষ প্রকাশনী
৩৮/২-ক, বাংলাবাজার (২য় তলা), ঢাকা।
ফোনঃ ৭১১৮৪৪৩, ৮১১২৪৪১, ৮৬২৩২৫১.
কলকাতায় পরিবেশক/প্রাপ্তিস্থান
রিতা ইন্টারন্যাশনাল
৩৬, পি.এন. ব্যানার্জি রোড, কলকাতা
ফোনঃ ২৫১৩৮৩৫৯, ৯৮৩০৪৩৯৬৭৯, +৯১৯৮৩০৪৩৯৬৭৯


