Photoshop Tutorial - Part002

এক নজরে এডোবি ফটোশপ CC (স্পেশাল ইফেক্টসহ)
লেখক- বাপ্পি আশরাফ
প্রকাশক- জ্ঞানকোষ প্রকাশনী
পৃষ্ঠাসংখ্যা- বড় সাইজে ৬৩২ পৃষ্ঠা
বৈশিষ্ট- সম্পূর্ণ ব্যবহারিক ও প্রোজেক্ট ভিত্তিক এবং নিজে নিজে শেখার সুবিধা।
মূল্য- সিডি সহ ৪৫০ টাকা মাত্র
যোগাযোগ: 02-7118443, 8623251 বা 58616571 বা 01711271716 (Bappi Ashraf), 01711271718 (Syed Hasan), 01941494063 (Kashem Vai) বা
বা bappibd001@yahoo.com
এডোবি ফটোশপ সি সি
স্পেশাল ইফেক্টসহ
লেখক: বাপ্পি আশরাফ
কম্পিউটার গ্রাফিক্স এর ক্ষেত্রে ইমেজ বা ছবি এডিটিং করার জন্য বিশ্বের সবচেয়ে জনপ্রিয় সফটওয়্যারটির নাম এডোবি ফটোশপ। আর বর্তমানে ফটোশপের সর্বশেষ ভার্সনের নাম ফটোশপ সি সি । আর ফটোশপের উপর চমৎকার ব্যবহারিক একটি বই লিখেছেন জনপ্রিয় লেখক বাপ্পি আশরাফ। বইটি প্রকাশ করেছে জ্ঞানকোষ প্রকাশনী। বাপ্পি আশরাফ যে নিজস্ব একটি ভঙ্গিতে প্রোজেক্টের মাধ্যমে লিখে থাকেন, আলোচ্য বইটিতেও সেই স্বভাবসুলভ ভঙ্গিটি রয়েছে।
এক কথায় নবীন বা প্রফেশনাল যে কেউ বইটি ব্যবহার করলে বলতে হবে ‘চমৎকার’। বাপ্পি আশরাফ ফটোশপের এমন কিছু নতুন ফিল্টার দেখিয়েছেন যা অনেক প্রফেশনালকেও অবাক করবে। এরপর লেখক লিখেছেন “আমি ফটোশপে নিয়তই নতুন কিছু শিখে থাকি”। বইটি নবীন ব্যবহারকারী বা প্রফেশনাল- সবার জন্যই উপকারে আসবে। বড় সাইজের ৬৩২ পৃষ্ঠার বইটির দাম সিডিসহ মাত্র ৪৫০ টাকা। জ্ঞানকোষ প্রকাশনী ৩৮/২-ক বাংলা বাজারসহ বাংলাদেশ ও কোলকাতার সকল সম্ভ্রান্ত বইয়ের দোকানে বইটি পাওয়া যাচ্ছে। বইটির চমৎকার প্রচ্ছদ তৈরি করেছেন- বাপ্পি আশরাফ নিজেই।
লেখকের সাথে যোগাযোগ bappibd001@yahoo.com বা 0258616571, 01716171716
লেখকের সাথে যোগাযোগ bappibd001@yahoo.com বা 0258616571, 01716171716
=====================================================================
Photoshop Tutorial - Photoshop Toolbars- Part002
Hidden Tool
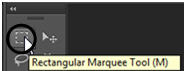
Most icons on the tool box contain multiple tools. These icons have a small arrow (Arrow) on the right. Clicking on this arrow will hold down a mouse button and a downward pop-up menu comes in, which has hidden tools. As such, click on the first tool, ie Rectangle Marquee, on the left side of the tool box, there will be a total of 4 available tools.
Hidden টুল
টুল
বক্সের অধিকাংশ আইকনে একাধিক টুল থাকে। এই আইকনগুলোর ডান দিকে একটা ছোট তীর চিহ্ন(Arrow) থাকে। এই তীর চিহ্নে ক্লিক করে মাউস বাটন ধরে রাখলে
একটি নিম্নগামী Pop-up মেনু আসে, যার মধ্যে Hidden
টুলগুলো থাকে। যেমন টুল বক্সের বাম দিকের প্রথম টুলটি অর্থ্যাৎ Rectangle Marquee টুলে ক্লিক করুন, আরও ৩টি সহ মোট ৪টি টুল দেখা যাবে।

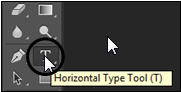
Notice that when you wait a little longer on the cursor over any tool, the name of the tool and keyboard shortcuts come in, it's called Tool Tips.
Tips! Alt+Windows বা Option (Mac OS) চেপে রাখা অবস্থায় কোন টুল আইকনে Click করলে পরবর্তী Hidden টুলটি সিলেক্ট হয়।
লক্ষ্য
করুন, যে কোন টুলের উপর কার্সর নিয়ে সামান্য অপেক্ষা করলে সেই টুলের নাম এবং
কী-বোর্ড শর্টকার্ট ভেসে আসে, এটিকে Tool Tips বলে।
Title Bar and Menu Bar
To open Photoshop, only the top bar in the PS is called the title bar and the name bar of the file, Edit, Image, on the right side of the title bar, Menu Bar. File> Save, File> Close, Select> All, etc. Here are the commands given here. This command is also called a menu command.
Title বার ও Menu বার
ফটোশপ খোলা মাত্র সবচেয়ে উপরে বামপাশে PS লেখা
বারটিই টাইটেল বার এবং টাইটেল বারের ডানপাশে File, Edit, Image ইত্যাদি লেখা বারটির নাম Menu বার।
File>Save,
File>Close, Select>All ইত্যাদি কমান্ড এখান থেকে দেওয়া হয়। এই কমান্ডকে মেনু
কমান্ডও বলা হয়ে থাকে।

Tool Options Bar
Using the Option bar, the setting of various tools is determined. Options bar also changes from the tool box as well as tool changes. At the top of the screen there are options bar under the menu bar.
Tool অপশনস বার
অপশন বার ব্যবহার করে বিভিন্ন টুলের সেটিং নির্ধারণ করা হয়। টুল বক্স থেকে
টুল পরিবর্তনের সাথে সাথে অপশনস বারও পরিবর্তন হয়। স্ক্রীনের উপরের দিকে মেনু
বারের নিচে অপশনস বার থাকে।

For the first time, Window> Color or F6 (or the name of a specific palette) command, the palette is flipped. The palette is closed again if the command is given from Window> Color or F6 (name of the palette name) again. First of all, when you start Photoshop, there are four palettes open (Photoshop 7.0 / 6.0 / 5.5)
Palette (প্যালেট)
প্রথমবার
Window>Color
বা F6
(কিংবা নির্দিষ্ট প্যালেটের নাম) কমান্ড দিলে নির্দিষ্ট প্যালেটটি ভেসে উঠে। আবার
মেনু থেকে Window>Color
বা F6
(নির্দিষ্ট প্যালেটের নাম) কমান্ড দিলে প্যালেট বন্ধ হয়। প্রথমে Photoshop শুরু করলে মোট চারটি প্যালেট খোলে(Photoshop 7.0/6.0/5.5 )|

Lets start
1. For new blank files in Photoshop, enter File> New (Ctrl + N) command from the menu. A dialog box will appear for new file settings.
প্রাকটিক্যাল :Photoshop-এ একটি ফাঁকা ফাইল নিয়ে একটু বিস্তারিত জানা যাক।
চলুন
শুরু করা যাক
১. ফটোশপে নতুন ফাঁকা ফাইলের জন্য মেনু থেকে File>New(Ctrl+N) কমান্ড দিন। নতুন ফাইলের সেটিং এর জন্য একটি ডায়ালগ বক্স
আসবে।

2. OK. Files with a white background will come in.
3. The foreground from the Color Selection box at the bottom of the toolbox means above
Click the color box.
1. Width অপশনে 426 Pixels, Height অপশনে 426 Pixels, Resulation অপশনে 71, Color Mode/Mode অপশনে RGB এবং নিচের দিকের Background Contents/Contents অপশনে White সিলেক্ট করুন।
2.
OK করুন। একটি সাদা রং এর Background সহ ফাইল আসবে।
3.
টুলবক্সের
নিচের দিকের Color
Selection বক্স থেকে উপরেরটি অর্থ্যাৎ Foreground
Color বক্সে ক্লিক করুন।

Color palette will come.
5. Choose a dark color.
কালার প্যালেট আসবে।
5. Choose a dark color.
কালার প্যালেট আসবে।
5. গাঢ় কোন কালার
সিলেক্ট করুন।

Now we can write something in our new file with a text tool or we can do something with a brush tool or make different edits. As mentioned earlier, tool options bar changes with different tool selections.
এখন আমরা আমাদের নতুন ফাইলে টেক্সট টুল দিয়ে কোন কিছু লিখতে পারি অথবা ব্রাশ টুল দিয়ে কিছু অাঁকতে পারি বা বিভিন্ন ধরণের এডিট করতে পারি। আগেই বলেছি বিভিন্ন টুল সিলেকশনের সাথে সাথে টুল অপশন বারের পরিবর্তন ঘটে।
এখন আমরা আমাদের নতুন ফাইলে টেক্সট টুল দিয়ে কোন কিছু লিখতে পারি অথবা ব্রাশ টুল দিয়ে কিছু অাঁকতে পারি বা বিভিন্ন ধরণের এডিট করতে পারি। আগেই বলেছি বিভিন্ন টুল সিলেকশনের সাথে সাথে টুল অপশন বারের পরিবর্তন ঘটে।
Tool Options Bar setting, Brush and Type tool
Take a look at the current options tool options bar (located under the menu bar). We will notice changes to the options as well as tools change.
Tool Options Bar সেটিং, Brush ও Type টুল
Take a look at the current options tool options bar (located under the menu bar). We will notice changes to the options as well as tools change.
Tool Options Bar সেটিং, Brush ও Type টুল
বর্তমান অবস্থার টুল
অপশন বারের (মেনু বারের নিচে অবস্থিত) অপশনগুলো দেখে নিন। আমরা টুল পরিবর্তনের
সাথে সাথে অপশনের পরিবর্তন লক্ষ্য করবো।
6. Click the Tools box and select Brush Tool. (Shortcut key = B)
6. টুল বক্স থেকে ক্লিক করে Brush টুল () সিলেক্ট করুন। (শর্টকাট কী = B)
6. টুল বক্স থেকে ক্লিক করে Brush টুল () সিলেক্ট করুন। (শর্টকাট কী = B)

Notice that there are various types of changes in the tool options.
লক্ষ্য করুন, Tool Options বারের বিভিন্ন ধরণের পরিবর্তন হয়েছে।
লক্ষ্য করুন, Tool Options বারের বিভিন্ন ধরণের পরিবর্তন হয়েছে।

প্রথমে একটি ব্রাশের ছবি থাকবে, দ্বিতীয় টুলে ব্রাশের সাইজ নির্ধারণের অপশন থাকবে। তৃতীয় অপশনে ডিফল্ট ব্রাশের মোড Normal সিলেক্ট থাকবে এবং এই মোড পরিবর্তনের অপশন থাকবে। চতুর্থ অপশন হচ্ছে Opacity অপশন। এখান থেকে ব্রাশ দিয়ে কিছু অাঁকলে তার গাঢ়ত্ব বা ঘনত্ব নির্দিষ্ট করা যাবে এবং পঞ্চম অপশন (Flow) থেকে একটি ব্রাশ ষ্ট্রোক হতে অপরটির দূরত্ব কত হবে তা নির্দিষ্ট করা যাবে ইত্যাদি।
7. Brush tool () and drag it into a new open blank image. A bold stroke of your selected dark color will come.
7. Brush টুল () দিয়ে নতুন খোলা ফাঁকা ইমেজটিতে ড্রাগ করে একটি দাগ দিন। আপনার সিলেক্ট করা গাঢ় কালারের একটি Stroke আসবে।
7. Brush টুল () দিয়ে নতুন খোলা ফাঁকা ইমেজটিতে ড্রাগ করে একটি দাগ দিন। আপনার সিলেক্ট করা গাঢ় কালারের একটি Stroke আসবে।

9. Notice, the options bar displayed below the menu bar will be changed.
৯. লক্ষ্য করুন, মেনু বারের নিচে প্রদর্শিত অপশন বার পরিবর্তিত হবে।
৯. লক্ষ্য করুন, মেনু বারের নিচে প্রদর্শিত অপশন বার পরিবর্তিত হবে।

It is called drop-down. Clicking on the drop-down comes a drop-down list according to the default setting and there are several options to choose from.
অপশন বারের প্রথমে একটি T লেখা থাকবে। অপশন বারে সব সময়ই বর্তমানে যে টুল নিয়ে কাজ করা হয় সেটি সিলেক্ট থাকে এবং সিলেক্টেড টুলের নিচের দিকে একটি নিম্নগামী তীর চিহ্ন থাকে।
এটিকে বলা হয় ড্রপ-ডাউন।
ড্রপ-ডাউন-এ ক্লিক করলে ডিফল্ট সেটিং অনুযায়ী একটি ড্রপ-ডাউন লিষ্ট আসে এবং এখান
থেকেও বিভিন্ন অপশন সিলেক্ট করা যায়।

অপশন বারের দ্বিতীয় অপশনে ফন্টের নাম থাকে। এখান থেকে ড্রপ-ডাউনে ক্লিক করে পছন্দের ফন্ট সিলেক্ট করা যায়। তৃতীয় বাটন থেকে ফন্টের এ্যাপিয়ারেন্স অর্থ্যাৎ Bold, Italic, Normal ইত্যাদি সিলেক্ট করা যায়। চতুর্থ অপশন থেকে ফন্টের সাইজ সিলেক্ট করা হয়। এ ছাড়াও বিভিন্ন ধরণের অপশন সিলেক্ট করা যায়, এ বিষয়ে পৃথক পৃথক ভাবে প্রোজেক্টের মাধ্যমে বিস্তারিত আলোচনা করা হয়েছে।
10. Type Tool () Select the blank image when you select and type NOVA.
When typing, an underline will appear at the bottom of the text and after the text, select any other tool, leaving the stain. (Photoshop CS or 8.0 only)
10. টাইপ টুল ( )
সিলেক্ট থাকা অবস্থায় ফাঁকা ইমেজে ক্লিক করুন এবং NOVA টাইপ
করুন।
)
সিলেক্ট থাকা অবস্থায় ফাঁকা ইমেজে ক্লিক করুন এবং NOVA টাইপ
করুন।
When typing, an underline will appear at the bottom of the text and after the text, select any other tool, leaving the stain. (Photoshop CS or 8.0 only)
10. টাইপ টুল (
টাইপ করার সময় লেখার
নিচে একটি আন্ডারলাইন আসবে এবং লেখা শেষে অন্য কোন টুল সিলেক্ট করলে দাগটি চলে
যাবে। (শুধুমাত্র Photoshop
CS বা 8.0)


11. Select the Move Tool (Toolbox) from Tool Box (shortcut key = V) and click NOVA to move it in different directions.
11. টুল বক্স থেকে Move টুল ( )
সিলেক্ট করুন (শর্টকাট কী = V) এবং NOVA লেখাটিতে ক্লিক করে
বিভিন্ন দিকে মুভ করুন।
)
সিলেক্ট করুন (শর্টকাট কী = V) এবং NOVA লেখাটিতে ক্লিক করে
বিভিন্ন দিকে মুভ করুন।
11. টুল বক্স থেকে Move টুল (
12. File> Close command, close the file. Computer wants to know whether to save the document. There will be 3 buttons for selection. If you do not want to save, click the No button.
12. File>Close কমান্ড দিয়ে, ফাইলটি Close করুন। কম্পিউটার জানতে চাইবে ডকুমেন্টটি Save করবে কিনা। সিলেকশনের জন্য ৩টি বাটন থাকবে। Save করতে না চাইলে No বা বাটনে ক্লিক করুন।
12. File>Close কমান্ড দিয়ে, ফাইলটি Close করুন। কম্পিউটার জানতে চাইবে ডকুমেন্টটি Save করবে কিনা। সিলেকশনের জন্য ৩টি বাটন থাকবে। Save করতে না চাইলে No বা বাটনে ক্লিক করুন।
Hope there is no problem getting familiar with the options bar.
আশা করি অপশন বারের সাথে পরিচিত হতে কোন অসুবিধা হয়নি।
আশা করি অপশন বারের সাথে পরিচিত হতে কোন অসুবিধা হয়নি।
************************** ************************
বিস্তারিত জানতে নিচের বইটি সংগরহ করে নিন


Book Name: Adobe Photoshop
Writer: Bappi Ashraf
Published By: Gyankosh Prokashani
Amount of Pages: 640
First Publish: October-2002
Last Edition: We've February-2015 edition. Future edition may be existed!
Book Price: BDT 450 with CD
The writer of this book has told that he has written this book with the concept of "teach yourself". On the other hand, Web Design is a thing which is interesting to learn. He has also told that the book is full of fan and enjoyment so that a person can learn Web Design by himself by playing with the example projects of this book. Book's CD Link below...

Part 013 - ইমেজCopy, Paste এবং Magic Eraser, Move টুল ও Layer এর ব্যবহার, Magic Eraser টুলের ব্যবহার

জ্ঞানকোষ প্রকাশনী
৩৮/২-ক, বাংলাবাজার (২য় তলা), ঢাকা।
ফোনঃ ৭১১৮৪৪৩, ৮১১২৪৪১, ৮৬২৩২৫১.
কলকাতায় পরিবেশক/প্রাপ্তিস্থান
রিতা ইন্টারন্যাশনাল
৩৬, পি.এন. ব্যানার্জি রোড, কলকাতা
ফোনঃ ২৫১৩৮৩৫৯, ৯৮৩০৪৩৯৬৭৯, +৯১৯৮৩০৪৩৯৬৭৯


