php_mysql-part1_PHP-MySql Projects
আপনাদের মনে আছে নিশ্চয় আমরা HTML ও CSS এর যে বাসত্মব
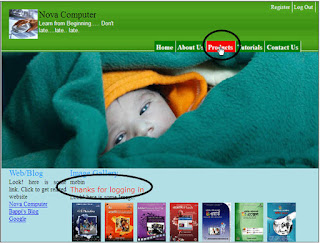
প্রোজেক্টটি করেছিলাম My Index_final.html নামে সেটিতে পর্যাপ্ত PHP কোডিং সংযুক্ত করবো এবং প্রয়োজনীয় ডাটবেজ MySql দিয়ে তৈরী করে লিংক তৈরী করবো। চলুন পেজটির ১টি
ছবি আবার দেখে নেওয়া যাক।
আমরা Php কোডিং এর জন্য
এডিটর হিসাবে Notepad++ বা Dreamweaver
ব্যবহার করবো। কিমত্ম এর Mysql ডাটাবেজের জন্য আমাদের কম্পিউটারে Apache
সার্ভার লোড থাকতে হবে। নিশ্চয় জানেন অফলাইনে কাজ
করার জন্য আপনার কম্পিউটারকে ওয়েব সার্ভারে পরিনত করতে হবে। এজন্য আপনার
কম্পিউটারে XAMPP/WAMP (Windows), MAMP (Macintosh-apple) বা LAMP (Linux OS) ইনষ্টল করতে হবে। আপনার Windows মেশিনের জন্য XAMPP লোড করে নিতে
হবে। XAMPP এর অর্থ হলো Extensable
(cross platform যেমন Linux,
Window, Solaris, MacOS ইত্যাদি যেকোন
অপারেটিং সিস্টেম চলবে।) Apache,
HTTP Server, Mysql, Php ও Perl সংক্ষেপে XAMPP. যদি আপনার কম্পিউটারে এটি ইনষ্টল করা না থাকে তবে ইনষ্টল করে নিন। । এছাড়াও
www.apachfriends.org/en/xampp.html
সাইট থেকেও এটি ডাউন লোড করে নিন এবং ইন্সটল করে
নিন।
PHP ফাইলে কাজ করা
আমাদের তৈরী করা পূর্বের ফাইলটিতে Regiter ও Login বাটন সংযোজন
করবো। পরে একটি Logout বাটন সংযোজন
করবো। পূর্বের ফাইলে Home ও About
Us পেজ সংযোজন করা ছিল। বাকী Products,
Tutorials ও Contact Us পেজ
সংযোজন করবো। Total Page Viewer এর জন্য কোডিং লিখবো Tutorials পেজে একটি Poll সংযোজন করবো
ইত্যাদি বিভিন্ন বিষয় সংযোজন করবো। আমাদের Product এ ব্যবহৃত প্রয়োজনীয় ফাইল, ইমেজ ইত্যাদি Link : download from Here
এর মধ্যে mysite নামক ফোল্ডারে দেওয়া আছে এখান থেকে পর্যাপ্ত ফাইল ও ইমেজ কপি করে নিতে
পারেন বা নিজেও কোডিং করে নিজস্ব ইমেজ দিয়ে সাইট তৈরী করতে পারেন। mysite ফোল্ডার থেকে My Index Final.html ফাইলটি খুলুন, নিচের মত কোডিং পাওয়া যাবে। ( আমরা
Notepad++ দিয়ে খুলেছি) বা নিজে
কোডিং করে নিচের মত html ও css ফাইল তৈরী করে নিন।
Program : My Index_final.html
<html>
<head>
<meta http-equiv="Content-Type"
content="text/html"; />
<title>web example</title>
<link href="css/My Style_final.css"
rel="stylesheet" type="text/css" />
<style type="text/css">
</style></head>
<body>
<div id="wrapper">
<div id="head">
<div id="logo"> <img src =
"images/Logo.jpg" height="75" width="75"
align="left"/>
Nova Computer <br/>
<span
class="subtext">Learn from Beginning..... Don't late....late..
late.</span></div>
<div id="menu"><ul class="menuitem">
<li><a href="My
Index_final.html">Home</a></li>
<li><a
href="aboutus.html">About Us</a></li>
<li><a
href="#">Products</a></li>
<li><a
href="#">Tutorials </a></li>
<li><a
href="#">Contact Us</a></li>
</ul> </div>
<div id="image"><img
src="images/banner.jpg" height="300" width="850"
align="left" /> </div>
</div>
<div id="content">
<div id="content_left"> <span
class="title"> Web/Blog</span> <br />
Look! here is some link. Click to get related website <br />
<a href="http://novacomputerbd.com">
Nova Computer</a><br />
<a
href="http://bappiashraf.blogspot.com"> Bappi's Blog
</a><br />
<a
href="http://google.com"> Google</a></p>
</div>
<div id="content_mid"><span
class="title">About Nova Computer</span><br />
Look! Our product written by
Bappi Ashraf. He has written various book about computer. And go on..Look! Our
product written by Bappi Ashraf. He has written various book about computer.
And go on.. Look! Our product written by Bappi Ashraf. He has written various
book about computer. And go on.. Look!
Our product written by Bappi Ashraf. He has written various book about
computer. And go on..
Bappi Ashraf is an actor and
computer books author. He has written verious kind of computer books.
</div>
<div
id="content_right"><span class="title">
Image Gallery </span><br /> Look! here is some Image.<br
/>
<img class="sample"
src="images/Photoshop.jpg">
<img class="sample"
src="images/Illustrator.jpg">
<img class="sample" src="images/Premiere.jpg">
<img class="sample" src="images/Flash.jpg">
<img class="sample" src="images/Word.jpg">
<img class="sample" src="images/Excel.jpg">
<img class="sample" src="images/Office.jpg">
<img class="sample" class="sample"
src="images/Windows.jpg">
<img class="sample"src="images/Photoshop.jpg"/>
</div>
</div>
</body>
</html>
Program : My Style_final.css
/* CSS Document */
body{background:#CCCCCC;
}
#wrapper{background:#FFFFFF;
width:850px;
height:auto;
margin-left:80px;
margin-top:50px;
}
#head{background-image:url('top_bg.jpg');
width:850px;
height:400px;
margin:0px;
}
#logo{width:300px;
height:80px;
padding:20px;
font-size:24px;
float:left;
}
.subtext{font-family:Arial, Helvetica, sans-serif;
font-size:14px;
color:#ffffff;
}
#menu{width:450px;
height:29px;
float:right;
font-size:18px;
margin-top:100px;
}
ul.menuitem {
list-style:none; /* removes bullets */
margin:0;
padding:0;
width:auto;
}
ul.menuitem li {
padding:0;
margin:0;
display:inline;
}
ul.menuitem li a:link, ul.menuitem li a:visited {
float:left;
font-weight:bold;
text-decoration:none;
color:white;
background-color:green;
padding:5px;
border-right:2px solid white;
}
ul.menuitem li a:hover {
background-color:red;
}
#image{width:850px;
height:300px;}
#content{background-color:PowderBlue;
width:830px;
height:400px;
background:PowderBlue;
padding-top:00px;
padding-bottom:25px;
text-align:justify;
padding-left:10px;
padding-right:10px;
}
#content_left{
width:150px;
height:400px;
padding-left:10px;
padding-right:10px;
float:left;
text-align:justify;
}
#content_m{background-color:PowderBlue;
width:820px;
height:400px;
background:PowderBlue;
padding-top:00px;
padding-bottom:25px;
text-align:justify;
padding-left:10px;
padding-right:10px;
}
#content_mid{background-color:PowderBlue;
width:310px;
height:auto;
float:left;
text-align:justify;
padding-left:10px;
padding-right:10px;
}
#content_right{
width:270px;
height:auto;
padding-left:10px;
padding-right:10px;
float:right;
text-align:justify;
}
.title{font-size:22px;
color:#0099FF;
}
img.sample { float:left; width:75px; height:100px; margin:5px; }
#footer{
width:850px;
height:auto;
color:#ffffff;
background:#ff0000;
padding-top:10px;
padding-bottom:10px;
text-align:center;
-moz-border-radius-bottomleft:15px; /*from here for bottom*/
-moz-border-radius-bottomright:15px;
-webkit-border-bottom-left-radius:15px;
-webkit-border-bottom-right-radius:15px;
}
Program : aboutus.html
<html>
<head>
<meta http-equiv="Content-Type"
content="text/html"; />
<title>web example</title>
<link href="css/My Style_final.css"
rel="stylesheet" type="text/css" />
<style type="text/css">
</style></head>
<body>
<div id="wrapper">
<div id="head">
<div id="logo"> <img src =
"images/Logo.jpg" height="75" width="75"
align="left"/>
Nova Computer <br/>
<span
class="subtext">Learn from Beginning..... Don't late....late..
late.</span></div>
<div id="menu"><ul class="menuitem">
<li><a href="My
Index_final.html">Home</a></li>
<li><a
href="aboutus.html">About Us</a></li>
<li><a
href="#">Products</a></li>
<li><a
href="#">Tutorials </a></li>
<li><a
href="#">Contact Us</a></li>
</ul> </div>
<div id="image"><img
src="images/banner.jpg" height="300" width="850"
align="left" /></div>
</div>
<div id="content"><span
class="title">Nova Computer</span><br />
Look! here is some link. Click to get related website <br />
For those students interested in training on a specific application, but
don't wish to take a course, there is one-on-one instruction available. Rates vary depending on the subject matter
and schedules are flexible in order to meet your busy work commitments. For information and rates please email or Contact us describing your requirements.
Corporate training is also available either at the Center or at your
site. If training requirements do not
fit our standard course curricula, we will design programs in concert with your
company. Rates vary depending on the
subject matter.
</div>
<div id="footer">all right reserved by <a
href="http://bappiashraf.blogspot.com">Bappi
Ashraf</a></div>
</div>
</body>
</html>
এখন আমরা মূল কাজটি শুরু
করবো।


বিস্তারিত জানতে নিচের বইটি সংগরহ করে নিন।
Book Name: Mastering Microsoft Word
Writer: Bappi Ashraf
Published By: Gyankosh Prokashani
Amount of Pages: 464
First Publish: October-2004
Last Edition: We've February-2015 edition. Future edition may be existed!
Book Price: BDT 350 (30% Discount)
The writer of this book has told that he has written this book with the concept of "teach yourself". On the other hand, Web Design is a thing which is interesting to learn. He has also told that the book is full of fan and enjoyment so that a person can learn Web Design by himself by playing with the example projects of this book. Book's CD Link below...
RELATED POST LINKS BELOW ********************************************
part1_PHP-MySql Projects
part2_HTML ফাইলগুলিকে PHP তে রূপান্তর করা
part3_Registration.php ফাইল তৈরী
part4_MySQL নিয়ে কাজ করা
part5_php দিয়ে mysql এর ডাটাবেজে connect করা
part6_Registration.php ফাইলকে Modify করা
part7_Log-in পেজ তৈরী
part8_Header.php ফাইলে session সংযোগ
part9_কোন পেজ কে Restrict করা ও Product.php ফাইল তৈরী করা
part10_Hit Counter তৈরী করা


