css_part23

CSS Float এর ব্যবহার
CSS Float অবজেক্টকে ডানে বা বামে চাপ দিয়ে একটির পর একটি পাশাপাশি বসিয়ে দেয়। একটি
অবজেক্টের সাথে অন্য অবজেক্টকে র্যাপ (Wrap) করিয়ে দেয়। এক্ষেত্রে Text এর সাথে Imageও হতে পারে। তবে এই ফ্লোটিং
শুধুমাত্র Horizontally হতে পারে। মানে বামে বা ডানে, কখনও উপর বা নিচ হয়
না। এতে ফ্লোটিং করা অবজেষ্টের উপর বা নিচের অবজেষ্টে কোন প্রভাব পরবে না। যদি
ইমেজ ডান দিকে ফ্লোট করা হয় টেক্সট বাম দিকে বসবে। অপর দিকে ইমেজ বাম দিকে ফ্লোট
করলে টেক্সট ডান দিকে বসবে। float এর value হচেছ left, right, both ও inherit। চলুন নিচের মত program
তৈরী করি।
নিচের মত কোডিংসহ আরও একটি HTML ফাইল তৈরী
করুন।
<!DOCTYPE
html>
<html>
<head>
<title>
This is CSS float properties</title>
<style>
img
{float:right;}
</style>
</head>
<body>
<p>Look!
here is some text and these are not floating.Look! here is some text and these
are not floating.Look! here is some text and these are not floating.Look! here
is some text and these are not floating.Look! here is some text and these are
not floating. </p>
<p>
<img
src="Photoshop.jpg" width="100" height="132"
/>
Look!
here is some text and these are floating left because the image is floating
right.Look! here is some text and these are floating left because the image is
floating right.Look! here is some text and these are floating left because the
image is floating right.Look! here is some text and these are floating left
because the image is floating right.Look! here is some text and these are
floating left because the image is floating right. </p>
</body>
</html>
ব্রাউজার দিয়ে খুললে নিচের মত ফলাফল পাওয়া যাবে।
একাধিক ইমেজ
ব্যাবহার করে float করা
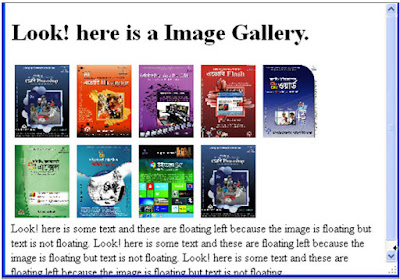
আমরা এখন কয়েকটি ইমেজকে float করবো float:left
দেওয়ার কারণে প্রথমটি বামে বসবে এবং অন্য গুলি ডানেদিকে পর পর বসতে থাকবে। প্রথম
লাইনে কয়টি ইমেজ বসবে সেটি ব্রাউজারের width এর উপর নির্ভর করবে।
নিচের মত কোডিংসহ আরও একটি HTML ফাইল তৈরী
করুন।
<!DOCTYPE
html>
<html>
<head>
<style>
img.sample{ float:left; width:100px;
height:132px; margin:5px;}</style>
</head>
<body>
<h1>Look!
here is a Image Gallery.</h1>
<p>
<img
class="sample" src="Photoshop.jpg">
<img
class="sample" src="Illustrator.jpg">
<img
class="sample" src="Premiere.jpg">
<img
class="sample" src="Flash.jpg">
<img
class="sample" src="Word.jpg">
<img
class="sample" src="Excel.jpg">
<img
class="sample" src="Office.jpg">
<img
class="sample" src="Windows.jpg">
</p>
</body>
</html>
ব্রাউজার দিয়ে খুললে নিচের মত ফলাফল পাওয়া যাবে।
Float বন্ধ করা
Float করা অবজেষ্টের নিচের অবজেক্টও float হতে থাকবে। যেখানে থেকে float বন্ধ করতে হবে
চান সেখানে clear কমান্ড ব্যবহার করতে হবে নিচে পর পর ২টি
প্রোগ্রাম দেওয়া হলো প্রথমটি floatসহ এবং পরের টি clear
কমান্ডসহ। কোডিং ভালো করে লক্ষ্য করুন।
নিচের মত কোডিংসহ আরও একটি HTML ফাইল তৈরী
করুন।
<!DOCTYPE
html>
<html>
<head>
<title>
This is CSS float properties</title>
<style>
img.sample { float:right; width:75px;
height:100px; margin:5px; }
p.clear{clear:both;
margin-bottom:2px;} </style>
</head>
<body>
<h1>Look!
here is a Image Gallery.</h1>
<img
class="sample" src="Photoshop.jpg">
<img
class="sample" src="Illustrator.jpg">
<img
class="sample" src="Premiere.jpg">
<img
class="sample" src="Flash.jpg">
<img
class="sample" src="Word.jpg">
<img
class="sample" src="Excel.jpg">
<img
class="sample" src="Office.jpg">
<img
class="sample" class="sample"
src="Windows.jpg">
<img
class="sample"src="Photoshop.jpg"/>
<p>Look!
here is some text and these are floating left because the image is floating
right.Look! here is some text and these are floating left because the image is
floating right.Look! here is some text and these are floating left because the
image is floating right.Look! here is some text and these are floating left
because the image is floating right.Look! here is some text and these are
floating left because the image is floating right. </p>
</body>
</html>
</html>
ব্রাউজার দিয়ে খুললে নিচের মত ফলাফল পাওয়া যাবে।
নিচের clear কমান্ডসহ প্রোগ্রাম
দেওয়া হলো। clear কমান্ডে value হিসাবে left, right, both, none, inherit দেওয়া যায়।
নিচের মত কোডিংসহ আরও একটি HTML ফাইল তৈরী
করুন।
<!DOCTYPE
html>
<html>
<head>
<title>
This is CSS float properties</title>
<style>
img.sample
{ float:left; width:75px; height:100px; margin:5px; }
p.clear{clear:both;
margin-bottom:2px;}
</style>
</head>
<body>
<h1>Look!
here is a Image Gallery.</h1>
<img
class="sample" src="Photoshop.jpg">
<img
class="sample" src="Illustrator.jpg">
<img
class="sample" src="Premiere.jpg">
<img
class="sample" src="Flash.jpg">
<img
class="sample" src="Word.jpg">
<img
class="sample" src="Excel.jpg">
<img
class="sample" src="Office.jpg">
<img
class="sample" class="sample" src="Windows.jpg">
<img
class="sample"src="Photoshop.jpg"/>
<p
class="clear">Look!
here is some text and these are floating left because the image is floating but
text is not floating. Look! here is some text and these are floating left
because the image is floating but text is not floating. Look! here is some text
and these are floating left because the image is floating but text is not
floating. </p>
</body>
</html>
ব্রাউজার দিয়ে খুললে নিচের মত ফলাফল পাওয়া যাবে।
Float এ Border ও margin সংযোজন
Float এ border, margin ইত্যাদি Property সংযোজন করা যায়। নিচের
প্রোগ্রামটি তৈরী করুন।
নিচের মত কোডিংসহ আরও একটি HTML ফাইল তৈরী
করুন।
<!DOCTYPE
html>
<html>
<head>
<style>
img {float:right; border:3px dotted red;
margin:5px 5px 15px 20px;}</style>
</head>
<body>
<p>Look!
here is some text and these are not floating.Look! here is some text and these
are not floating.Look! here is some text and these are not floating.Look! here
is some text and these are not floating.Look! here is some text and these are
not floating. </p>
<p>
<img src="Word.jpg" width="100" height="132"
/>
Look!
here is some text and these are floating left because the image is floating
right.Look! here is some text and these are floating left because the image is
floating right.Look! here is some text and these are floating left because the
image is floating right.</p>
</body>
</html>
ব্রাউজার দিয়ে খুললে নিচের মত ফলাফল পাওয়া যাবে।
Float এর সাথে Text সংযোগ
আলাদা একটি <div> এর মধ্যে ইমেজকে float করলেই Text সংযোজন করা যাবে। নিচের কোডিং দিয়ে একটি
প্রোগ্রাম তৈরী করুন।
নিচের মত কোডিংসহ আরও একটি HTML ফাইল তৈরী
করুন।
<!DOCTYPE
html>
<html>
<head>
<title>
This is CSS float properties</title>
<style>
div{float:right;
border:3px dotted red; margin:5px 5px 15px 20px;}</style>
</head>
<body>
<p>Look!
here is some text and these are not floating.Look! here is some text and these
are not floating.Look! here is some text and these are not floating.Look! here
is some text and these are not floating.Look! here is some text and these are
not floating. </p>
<p>
<div><img
src="Word.jpg" width="100" height="132" />
<br />This ia an image </div>
Look!
here is some text and these are floating left because the image is floating
right.Look! here is some text and these are floating left because the image is
floating right.Look! here is some text and these are floating left because the
image is floating right.</p>
</body>
</html>
ব্রাউজার দিয়ে খুললে নিচের মত ফলাফল পাওয়া যাবে।
বিস্তারিত জানতে নিচের বইটি সংগরহ করে নিন।
Writer: Bappi Ashraf
Published By: Gyankosh Prokashani
Amount of Pages: 464
First Publish: October-2004
Last Edition: We've February-2015 edition. Future edition may be existed!
Book Price: BDT 350 (30% Discount)
The
writer of this book has told that he has written this book with the
concept of "teach yourself". On the other hand, Web Design is a thing which is
interesting to learn. He has also told that the book is full of fan and
enjoyment so that a person can learn Web Design by himself by playing with
the example projects of this book. Book's CD Link below...
Next_


