JavaScript_part8_Continue Statement, জাভাস্ক্রিপ্ট অ্যালার্ট বক্স ও প্রম্পট বক্স

Continue Statement
মূল কথা হল Continue স্টেটমেন্টটি বর্তমান লুপটিকে ছেড়ে পরবর্তী লুপ
থেকে আবার একই রকম কাজ করতে থাকবে।
প্রোগ্রামঃ Continue
Statement ব্যবহার
১। আপনার এডিটরে নিচের কোডিং এর
মত করে প্রোগ্রাম লিখুন
২। এবার ফাইলটিকে কে একটি নির্দিষ্ট নামে সেভ করুন। আমরা এখানে program_0033.html নামে সেভ করেছি।
<html>
<head>
<title>While
Example</title>
<script
type="text/JavaScript">
function
CalculateSum()
{
var
number=document.getElementById("txtNumber").value;
number=parseInt(number);
var i;
var sum=0;
for(i=1;i<=number;i++)
{
if(i==5)
{
continue;
}
sum=sum+i;
}
alert("
The Summation of "+number+ " is = " +sum);
}
</script>
<head>
<body>
Input Number: <input type="text"
id="txtNumber" /><br />
<button
onclick="CalculateSum();">OK</button>
</body>
</html>
ফলাফল : ব্রাউজারে program_0033.html ফাইলটি ওপেন করুন। যে কোন ভ্যালু ইনপুট দিন।
ব্যাখ্যা: প্রোগ্রামটি মূলত: ১ থেকে n পর্যন্তু যোগফলের প্রোগ্রাম। কিন্তু যত বারই আপনি যে কোন নাম্বার ইনপুট দিন
না কেন মোট যোগফল থেকে 5 কম ফলাফল পাবেন। কারণ
if (i=5)
continue
}
এই স্টেটমেন্ট দ্বারা বুঝায় যে, 5তম লুপটি Cancel হবে আবার 6তম লুপ থেকে পুনরায় লুপ শুরু হবে।
জাভাস্ক্রিপ্ট পপ আপ
বক্স
এই অংশে আমরা শিখব-
জাভাস্ক্রিপ্ট
অ্যালার্ট বক্স
জাভাস্ক্রিপ্ট
কনফার্ম বক্স
জাভাস্ক্রিপ্ট
প্রম্পট (Prompt) বক্স
জাভাস্ক্রিপ্ট অ্যালার্ট (Alert) বক্স
জাভাস্ক্রিপ্ট আপনার ব্রাউজারে খুবই সহজে কোন Alert দিতে পারে । এক্ষেত্রে আপনাকে নিম্নের মত করে
কোড লিখতে হবে অর্থ্যাৎ Alert () ফাংশন ব্যবহার করতে হবে।
প্রোগ্রাম : Alert () উদাহরন
১। আপনার
এডিটরে নিম্নোক্ত কোডগুলো লিখুন।এবার ফাইলটিকে কে একটি নির্দিষ্ট নামে সেভ করুন। আমরা এখানে program_0034.html নামে সেভ করেছি।
<!DOCTYPE html>
<html>
<body>
<head>
<title>
Alert Example
</title>
<script
type="text/javascript">
function DisplayAlert()
{
alert("Hellow this is Alert Box")
}
</script>
</head>
<body>
<button type="button"
onclick="DisplayAlert()">Display Alert </button>
</body>
</html>
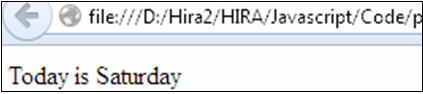
ফলাফল : এবার আপনার ব্রাউজারে program_0034.html
ফাইলটি ওপেন করুন। নিম্নের চিত্রের মত ফলাফল
দেখতে পাবেন।


ব্যাখ্যা: এখানে
Alert () ফাংশনের মধ্যে আপনি যেকোন text value লিখতে পারেন যেটি Alert বক্সের
মাঝে দেখা যাবে। আমরা উপরোক্ত উদাহরনে একটি বাটন তৈরি করেছি এবং যার On
click ইভেন্টে আমাদের Display Alert () নামের ফাংশনটি কল করা আছে। এর
মানে হল এই যে আপনি যখন Display Alert বাটনটিতে ক্লিক করবেন তখনই Alert দেখা যাবে।
এবার বাটনটিতে ক্লিক
করম্নন নিমেণর চিত্রের মত Alert বক্স দেখা যাবে।


জাভাস্ক্রিপ্ট
অ্যালার্ট (Confirm) বক্স
যেকোন দুটো কাজের মধ্যে
একটি করার জন্য Confirm () ব্যবহার করা হয়।
Confirm () উদাহরন
১। আপনার
এডিটরে নিম্নোক্ত কোডগুলো লিখুন
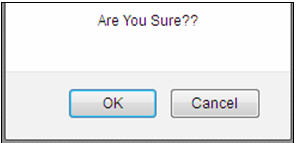
২। এবার ফাইলটিকে কে একটি নির্দিষ্ট নামে সেভ করুন। আমরা এখানে program_0035.html নামে সেভ করেছি। এখানে দেখতে
পাবেন যে Confirm () ফাংশনের মাঝে “Are
you sure??” এ কথাটি লিখা আছে।
<!DOCTYPE html>
<html>
<body>
<head>
<title>
Javascript Confirm Box
</title>
<script
type="text/javascript">
function DisplayConfirm()
{
confirm("Are You Sure??")
}
</script>
</head>
<body>
<button type="button"
onclick="DisplayConfirm()">Display Confirm</button>
</body>
</html>
ফলাফল : এবার আপনার ব্রাউজারে program_0035.html
ফাইলটি ওপেন করুন। নিম্নের চিত্রের মত ফলাফল
দেখতে পাবেন। Display Confirm বাটনে ক্লিক করুন
।
এক্ষেত্রে ও Display বাটনের
Onclick event এ Display
Confirm ফাংশনটি কল করা আছে তাই Display Confirm বাটনে ক্লিক করলেই নিমেণর চিত্রের ন্যায় আউটপুট
দেখতে পাবেন।

Confirm () মূলত দুটি ভ্যালু
রিটান করে true বা false.
ok বাটনে প্রেস করলে true হল নতুবা false হয়।চলুন নিচের প্রোগ্রামটি প্রাকটিস করা যাক
কনফার্ম বক্সের উদাহরণ:
১. আপনার এডিটরে নিম্নোক্ত
কোডগুলো লিখুন। এবার ফাইলটিকে কে একটি নির্দিষ্ট নামে সেভ করুন। আমরা এখানে program_0036.html নামে সেভ করেছি।
<html>
<head>
<title>Confirm
Box Example</title>
<script
type="text/JavaScript">
function
ConfirmTest()
{
var Con_Check=confirm("Are you sure to
Enter Our Site");
if(Con_Check==true)
{
window.open('http://www.novacomputerbd.com');
}
else
{
alert("You did Not Enter");
}
}
</script>
<head>
<body>
<button
onclick="ConfirmTest();">Click Me</button> </body> </html>
ফলাফল : এবার আপনার ব্রাউজারে program_0036.html
ফাইলটি ওপেন করুন। নিম্নের চিত্রের মত ফলাফল
দেখতে পাবেন।


৩. এবার
click me-তে ক্লিক করুন। দেখুন নিচের ছবির মত একটি
কনফার্ম বক্স আসবে।


৪. এবার আপনি OK বা Cancle বাটন প্রেস করুন।
OK বাটনে প্রেস করলে novacomputer লিংক ওপেন হবে কারণ জাভাস্ক্রিপ্ট ফাংশনটিতে con_check নামক একটি
ভেরিয়েবল confirm( ) ফাংশনের রিটার্নকৃত ভ্যালু অ্যাসাইন করা হয়েছে।
যেহেতু confirm( ) ফাংশন true বা false রিটার্ন করবে। যদি OK বাটনে ক্লিক হয় তবে এটি true রিটার্ন করে। অন্যথায় false
রিটার্ন করে। তাই, OK বাটনে ক্লিক করলে con_check ভেরিয়েবলে true অ্যাসাইন হবে। এবার if কন্ডিশন দ্বারা চেক করা হল এবং Windows
Open ( ) ফাংশন ব্যবহার করে novacomputer.com এর লিংক ওপেন করা হল।WindowOpen( ) নতুন একটি উইন্ডো ওপেন করতে ব্যবহার করা হয়।
প্রম্পট (Prompt) বক্স
Prompt বক্স ব্যবহার করে আপনি
যে কোন পেজ-এ প্রবেশের পূর্বে ভ্যালু ইনপুট দিতে পারেন।
যখন Prompt বক্স Pop-up হয় তখন ভ্যালু ইনপুট
দিয়ে OK বা Cancel
বাটনে ক্লিক করতে হয়। OK বাটনে ক্লিক করলে ঐ ভ্যালু নিয়ে কাজ করা যায় অর্থাৎ prompt বক্স ঐ ভ্যালু রিটার্ন করে।
আর Cancel বাটনে ক্লিক করলে prompt বক্স null রিটার্ন করে।
সিনট্যাক্স (Syntax)
prompt(“...” “default value”)
Confirm () উদাহরন
১. আপনার
এডিটরে নিম্নোক্ত কোডগুলো লিখুন। এবার ফাইলটিকে কে একটি নির্দিষ্ট নামে সেভ করুন। আমরা এখানে program_0037.html নামে সেভ করেছি।
<html>
<head>
<title>Prompt
Box Example</title>
<script
type="text/JavaScript">
function
PromptTest()
{
var x;
var
name=prompt("Please enter your name","Bappi");
if
(name!=null)
{
x="Hello " + name + "!";
document.getElementById("txtName").value=x;
}
}
</script>
<head>
<body>
<input
type="text" id="txtName">
<button
onclick="PromptTest();">Click Me</button>
</body>
</html>
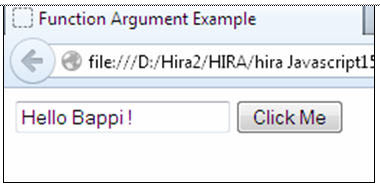
ফলাফল : এবার আপনার ব্রাউজারে program_0037.html
ফাইলটি ওপেন করুন।
২. Click me বাটনে ক্লিক করুন এবঙ দেখতে পাবেন যে prompt বক্সটি prompt নামসহ পপআপ হয়েছে।


৩. এবার
আপনি আপনার নাম লিখে OK বাটনে ক্লিক করুন।
text বক্সে নিম্নোক্ত ফলাফল দেখুন।


 Book Name: Mastering Microsoft Word
RELATED POST LINKS BELOW ********************************************

বিস্তারিত জানতে নিচের বইটি সংগরহ করে নিন।


Writer: Bappi Ashraf
Published By: Gyankosh Prokashani
Amount of Pages: 464
First Publish: October-2004
Last Edition: We've February-2015 edition. Future edition may be existed!
Book Price: BDT 350 (30% Discount)
The
writer of this book has told that he has written this book with the
concept of "teach yourself". On the other hand, Web Design is a thing which is
interesting to learn. He has also told that the book is full of fan and
enjoyment so that a person can learn Web Design by himself by playing with
the example projects of this book. Book's CD Link below...