RSS Graffiti
How to Use RSS Graffiti to Put Blog Posts on Facebook
To post your business blog entries automatically on your Facebook Timeline, you can use RSS Graffiti. This app doesn’t limit you to importing only blog posts: You can use it to bring in any RSS feed from anywhere, much as you can with Social RSS. You can also use RSS Graffiti to post in Facebook Groups.
You can control how many posts per day are pulled in, just in case the RSS feed you enter has more posts than you want to share with your community.
Adding RSS feeds can help you add content to your Page. You may want to use RSS feeds to import industry news or other helpful blogs. You can search some of the RSS-feed directories that are available, but you’re better off bringing in a feed from a site that you know, like, and trust.
RSS Graffiti is highly configurable. You can configure the post style, the scheduling of updates, and the times when the messages are posted. All these features translate into many settings, all of which you can change. Most of the settings can be left at their default values.
One thing that RSS Graffiti doesn’t have is a tab that you can add to your Page. It only posts the RSS feed on your Timeline. If you want a place to show your most recent blog posts on your Facebook Page, use Social RSS or NetworkedBlogs.
To get started with RSS Graffiti, follow these steps:
- Log in to Facebook as your personal Profile.
- Go to http://apps.facebook.com/rssgraffiti.You see information about the app and how it will appear on your Timeline.
- From the Who Can See Posts This App Makes for You on Your Facebook Timeline drop-down menu, choose Everyone.
- Click the blue Go to App button.You see a Request for Permission screen, asking you to allow RSS Graffiti to access your basic information.
- Click Allow.
- If you see a pop-up window, click Go to Permissions.You’re taken to the RSS Graffiti dashboard.
- Click Add New Publishing Plan.A window appears, allowing you to name your publishing plan.
- Type a name in the text box, and click Create Publishing Plan.A configuration area appears.

- Click the Add New button next to Sources.A pop-up window appears, allowing you to add your RSS feed.
- Add the address of your RSS feed (refer to “Getting the Address of Your RSS Feed,” earlier in this chapter), and click Add Source.A pop-up window appears, allowing you to configure the RSS feed.
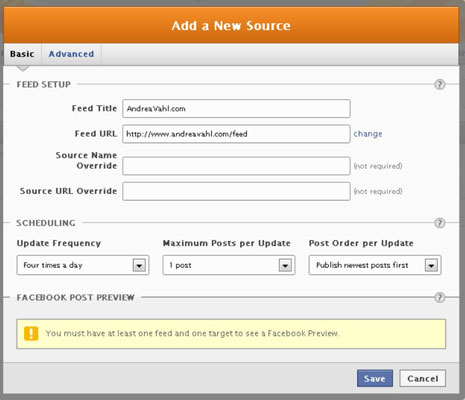 You can configure many features of RSS Graffiti, but the default settings work well for most people, and you can skip to Step 11.Or, if you want to customize your settings, you can read a little bit more about what each of the settings means here:
- Source Name Override: Change the name that appears when you post the article or blog post.
- Source URL Override: Override the URL that points to the website. Leave this field blank to use the feed’s URL.
- Scheduling: Change the update frequency and maximum posts per update, and specify whether you want the newest posts to post first.
On the Advanced tab, you can set these options:- Format Message: Add messages to each post, using these options. You may choose to add a static message such as New Post from my Blog or something similar.
- Filtering Options: Set the date and time after which posts can be published on your Timeline. Older posts won’t be published unless you change this option. You can indicate how long a post must be up before it’s posted to your Timeline by setting the Eligibility Age option. You may want to use this option if you sometimes make minor edits in posts shortly after you publish them.
- Click Save after you’ve configured your source RSS feed.The pop-up window disappears, and you see the name of the feed in the Sources area.
- Click Add New next to Target.A pop-up window appears, showing your available Pages and groups.
- Select the Page.You can also choose to publish on behalf of the Page or your personal Profile, but for now, accept the default selection of the Page.
- Select the post style.You can choose Standard, Compact, or Status Updates. A preview window appears next to each selection. Choose what works best for you by selecting the appropriate radio button.
- Click Save Changes.Your publishing plan is finished, and your posts will start updating when you make a new blog post.


